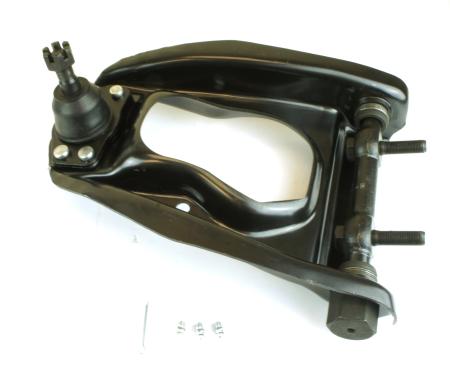
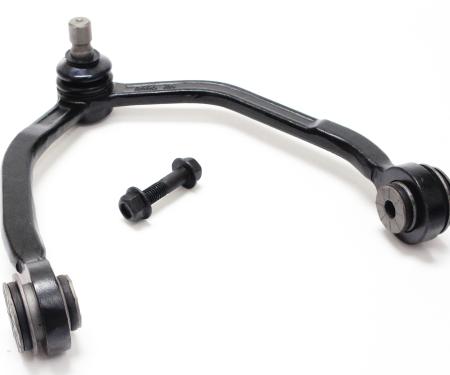
Front upper left control arm with integrated ball joint designed for 1989–1997 Ford and Mercury vehicles. This direct-fit suspension arm restores proper wheel alignment and steering geometry, securing the front wheel assembly while absorbing road forces and maintaining tire contact. Built from stamped steel with a durable coating and a pre-installed sealed ball joint, it delivers long-lasting reliability and simplified installation for restoration or routine suspension repairs. Ideal for replacing worn or damaged arms to eliminate play, reduce vibration, and improve handling.
Features:
- Fits 1989–1997 Ford and Mercury models (front upper left-hand position).
- Stamped steel construction with corrosion-resistant finish for durability.
- Pre-installed sealed ball joint restores steering precision and reduces play.
- Direct-fit replacement—no welding or modifications required.
- Helps prevent uneven tire wear, improves handling, and reduces vibration.
- Suitable for restoration projects and routine suspension maintenance.
Installation / Application:
- Difficulty: 2/5
- Estimated time: 45-90 minutes per side
Instructions:
- Park vehicle on level surface, engage parking brake, and block rear wheels.
- Loosen front wheel lug nuts slightly, raise vehicle with floor jack, and support with jack stands. Remove the wheel.
- Apply penetrating oil to control arm fasteners and ball joint nut; allow to soak if corroded.
- Remove the cotter pin (if present) and loosen the ball joint nut but do not fully remove yet.
- Separate the ball joint from the steering knuckle using a ball joint separator or pickle fork. Support the knuckle to avoid stressing the brake line or CV axle.
- Remove the control arm mounting bolts/nuts at the frame/subframe and any sway bar or link connections.
- Remove the old control arm from the vehicle.
- Compare the new control arm to the old unit to confirm correct fit and orientation.
- Install the new control arm into position and loosely install mounting hardware by hand.
- Reconnect the ball joint to the steering knuckle and tighten the nut to the manufacturer’s specified torque. Install cotter pin if applicable.
- Tighten frame/subframe mounting bolts to specified torque values.
- Reinstall the wheel, lower the vehicle, and torque lug nuts to specification.
- Have a professional wheel alignment performed after installation to ensure proper steering and tire wear.
About Redline Select
Redline Restomotive® has established itself as a premier brand in the world of classic car restoration, providing enthusiasts with high-quality parts that meet the exacting standards of original manufacturer specifications. Dedicated to the preservation of American automotive history, Redline Restomotive® combines advanced manufacturing techniques with an in-depth understanding of vintage vehicles. The result is a range of products that seamlessly blend into the design and function of classic cars, giving restorers and collectors the assurance that each part reflects the era’s style, quality, and performance.
Redline Select® is our premium line of steering and suspension products for all vehicle makes and models including both North American and Import vehicles. We have partnered with an ISO 9001/QS9000/TS16949 certified manufacturing facility with more than 40 years of experience in producing components that perform to the standards our customers expect. Our steering and suspension parts are backed by multiple quality control checks along the way—during production, prior to shipping from the factory, and at arrival. With our ISO 9001:2015 certification, we observe the world’s highest standards for quality management.
Vehicle Fitment:
The Vehicle Fitment Guide is to be used as a general reference. The data has been provided by our suppliers and manufacturers and may contain errors or incorrect data. Always refer to a professional to verify correct fitment for your vehicle.
| Make |
Model |
Years |
| Ford |
Thunderbird |
1989 - 1997 |
| Mercury |
Cougar |
1989 - 1997 |